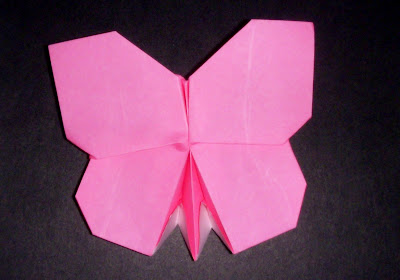
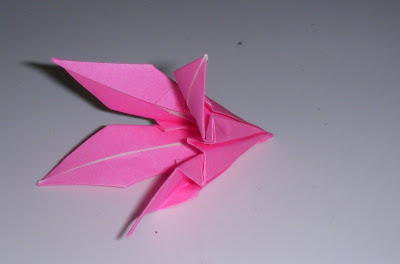
A butterfly today. After a long time I am folding a butterfly. Long back I had folded a series of butterfly I had seen this model then but didn’t find the instructions. It seemed to be too tough but beautiful.
Actually the model is not that tough as it may seem to its quite easy.
There were a few folds mentioned in the video which I felt were arbitarly done to shape up couldn’t make out the symmetry or logic of it.
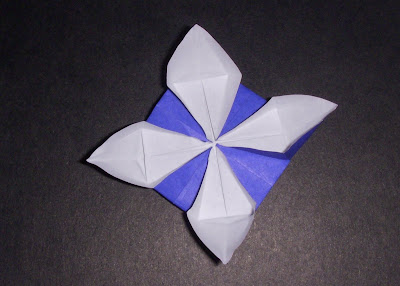
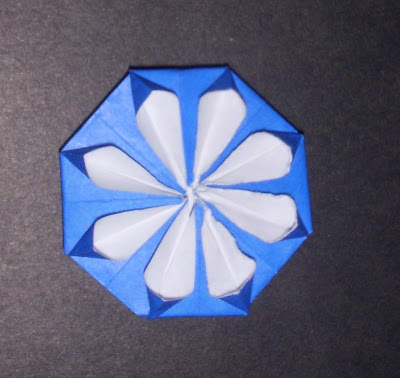
Day 28 - Origami Kusudama star
This can be considered modular origami.The modules for this kusudama were discussed in yesterday's post.This is the 1 st variation.
The model use the simple origami bases such as the book fold, the cupboard fold and windmill base. You need 6 sheets.The Kusudama contains 6 modules which are held together by glue .Gluing is bit cumbersome when the modules are really small.
The model in the pic has each module made of 1/4 of 3*3 inch 1 side coloured paper. I needed a toothpick to open the petals.
It makes a good ornament for the Christmas tree.You need to add thread to the model to make it hanging :P
It’s a simple origami decoration. It can be used on cards or to make kusuduma or some decorations. There are 2 variations to it .It starts with a square origami paper. And contrast coloured paper would be better than same coloured or one side coloured paper.
8 point star is designed by Dr. James Minoru Sakoda.It's nice model for Christmas tree but the demerit while putting it on the tree is that the front is wonderful but the back isn't that beautiful so if you hang it on the tree and it turns around ,then the star looks odd ( obviously.. ).
The model starts with the origami bird base.There are 2 places where I found it bit tricky or say difficult part in the model
When you need to sink the tip
At the end when you need to fold the edges for finishing touch to give it a proper star shape.
Otherwise the star is a beautiful model,easy and fast to make.It's good for Christmas cards.You can also make earring out of it but then the same problem will arise as in hanging the star on the christmas tree.
I made a few of these for my tree too... The star in pic is made of 3*3 " 1side coloured paper.
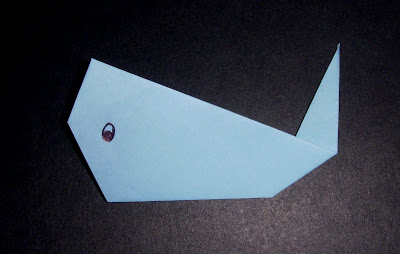
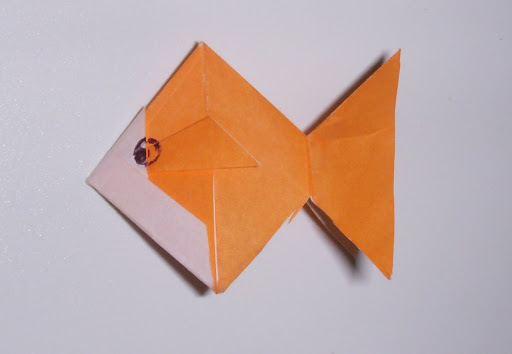
Today I have another fish model. Its easy and beautiful. Unlike the previous 2 fishes its bit tougher to fold but not too… tough and its looks better.
You need to start with the bird base. You need to be careful while you fold the tails so that the folds are crisp and perfect at the same time the folds should be aligned properly. Also be careful while you pull the fins out else you may end up tearing the paper.
You can draw up the eyes and scales on the body of the fish as suggested by the instructions. But I feel this looks better.
Its and easy fish which looks really elegant and seems like a manipulation of origami hat or origami traditional boat.
Complexity is simple but the page where I found this model instruction I felt the instructions are not upto the mark.The video seemed low quality and the pics are insufficient.I managed some how and the fish came out really well.
Yesterdays model was bit tough so today I have chosen a simple one. Something which can be categorized in easy origami and is traditional.
So its an origami bird called origami robin. The model is not pure origami model as it needs a little cutting so we can say its bit of Kirigami.
You have to start with a Origami bird base folding.My origami robin is made of 3*3 Inch origami paper.You need to draw the eyes and the beak needs to be coloured to give the bird its complete look.
My robin does not look as cute as the one in the diagram .It looks like a crap and the second photo became hazy as always I am lazy to take one more pic….
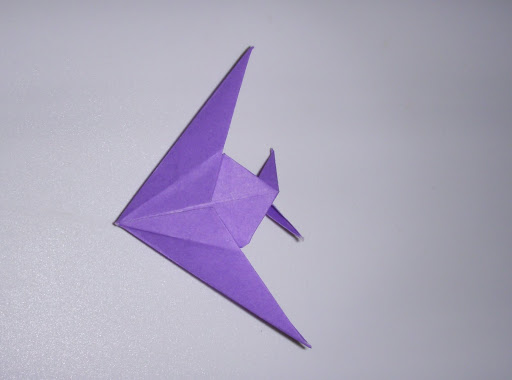
Today I am folding an origami dinosaur. The origami Dinosaur design by Stephen O’Hanlon and the original diagram is at fishgoth.com.I found the instruction at Origami-Instructions.com.
I started with an origami 5 7/8” inch green square origami paper. It starts with a bird base but as you proceed you will find certain folds though are simple are tough to fold either due to too many pieces fold together or reversing, but yet its really nice model and easy enough to fold.
I have given my Dino a little twist at the legs ,I mean I have folded the legs inside instead of outside as the Dino was not standing properly( always my animal folds have this problem).So now it stands without support. You can draw eyes etc on it but I felt it was still good without drawing (Lazy me!)
Another origami rabbit today.This is bit tougher than the previous one .
In the diagram and animation the rabbit seemed so simple and cute so I went ahead with the 3*3 inch one side coloured pick origami paper.First few folds went fine and I thought it would go well but some where I lost in between and folded it in such a way that the ears of the rabbit were in the front and the portion which had to become face went back.I tried reversing the folds and the face portion came in front but the overall rabbit was messed up.Though the final structure looked somewhat like the rabbit in the instruction but all the folds were visible and the worst it was not standing.
The rabbit seemed like some other animal and the tail, it should have been cute but mine seemed like some one forgot to fold the piece of peering paper.
But all said and sone I have made the rabbit.If you are wondering how it stands in the picture ,its no miracle I have glued it to the base to make it stand :)
Folding Instructions:-
Diagram:- Origami Club It has both diagram and animation.
Hmmm.... don't know if this actually resembles rabbit :). It is a simple 3 D model.To me it seemed more like an abstract 3D rabbit.
I started with a white 3"*3" inch paper,scissors and a pen.Scissors to cut and bring out the ears.So you can say its Kirigami rather than pur origami .Pen is required to draw the eyes of the rabbit.
I had earlier posted an origami swan.That was modular origami swan made of 500 pieces but this is simple origami where you can make a cute little swan in no time with minimum folds from a single sheet of square paper.
As the folds are few and the model is simple as usual I have taken a 3*3 inch Origami paper.Swans are white in colour ,also the model instruction had used a white sheet thus I too went for a white sheet you may try different colours ( of course you would even if I don't say so :P).
Difficulties I faced while folding : Hmm... I found the beak bit tricky or may be it was my patience which was running out which messed up the beak of the poor bird else it could have been better.Oh my duck has a terrible beak.:D
Folding Instruction:-
Diagram:-
You can get both diagram and animation at origami-club.com
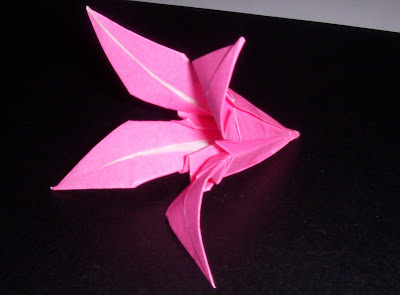
This is the Standard Lily/Iris with a little variation. The variation is projection between the petals instead of coming out are pushed in side giving the flower a new and pettier look.
I have used a 3"*3" Inch one side coloured Origami square paper.The complexity is medium.
A simple yet nice model.It doesnot take a long time to fold it.Easy enough yet u get a 3D model.
Start with a square piece of paper.You need to draw the eye of the bird yet the bird looks incomplete.As usual I have used a 3"*3" Inch one side coloured origami paper for the model.
Balloon Rabbit as the name suggests the model needs to be blown to get the final structure.Complexity is medium.
My Ballon Rabbit is made of 3"*3" square one side coloured Origami paper,but I would suggest that you try with a bigger paper because it was really tough to fold towards the end and blowing air was bit tougher too...
Ahh...you need to draw eyes and nose too else the model looks incomplete.
This model can be considered as kirigami as you need to do a little cutting for the tail piece .The fish is pretty simple but you need to be careful while making the tail of the fish as you need to cut and pull it back.If you are not careful you may tear the paper while cutting or while pulling it back.
My fish is made of 3"*3" Inches one side coloured Origami paper. You can try with larger paper.
Here is my fish:-
After drawing the eyes it looks bit better.:)
Folding Instructions:-
Diagram:- Origami-club : You can find both diagram and animation here.
Flowers are my favorite origami models. So I am back to flowers. I was searching for some other cherry blossom instruction when I stumbled upon this DIY instructions.
This is a 3D model, easy, simple and fast to fold. I have used a very small square to make the model as I felt larger flowers may not look that pretty. You may start with a larger paper. One more suggestion is to use a both side colored paper that way even if your folds are not perfect your flowers still looks pretty and the white side does n’t mare the beauty.
It starts with the standard origami crane folds with a little manipulation.You need to be a little careful when u give final shape to the flower.
Here is my flower.
Though it’s a 3D model but I feel this can be used on cards also.I have used 1/4th of 3"*3" Inch paper.The middle portion is made of 1/4 of 1/4 of 3*3" inch yellow origami paper. I didn't have crepe paper to use ( as suggested by the author).
This is difficult not very difficult but bit tough.My dolphin didn't turn out well but somewhat kind of I mean something near about the actual model.Half way through the instructions I lost it and kept on going back and forth on the instructions for quite a long time.
Here is my dolphin:-
I suppose an eye drawn on it would have made it look better,but the lazy person I am I didnt draw it.
Origami Sampan is another boat design.This a flat bottomed boat with cover.The model is simple except the last part where you would have to pull up the cover patiently else it would tear.
I have used standard origami square sheet for the model.For the first timers I would suggest to use a fairly large sheet.
Ah this was bit tough.The complexity is medium.Dont take a very hard paper or it would be really difficult. I would suggest the standard origami paper is the best.
The model is half crane and half origami fan but its not that simple :).You need patience to fold it. I lost a little patience and my phoneix had a few torn parts here and there but not that bad..
Its really nice model.It can be used as decoration piece,you can also make earrings out of it. I have another idea but if I am successful I will post here.
Here is my phoneix.
Folding Instructions:-
Diagram:- Origami-club
This link has both diagram and animation.
This one is pretty and easy. You need a square paper to start with and the model needs very few folds or rather I can say just the basic folds.Would consume only a few minutes yet a nice 3D model.Only difficulty I found was to keep the base as round.I mean I felt the points/edges of the base when connected should make a circle but mine didnt do so.
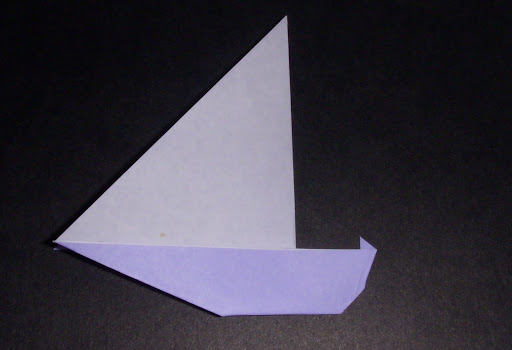
This is one can be termed as one of the simplest of origami instructions.The simple origami sail boat is a 2d design and takes hardly 2 minutes to fold.
It needs a triangular piece of paper.So I took a standard 1 side coloured square paper and folded it diagonally dividing the square into 2 triangle cut it into two and started with one triangle.
The sail boat would look the best if you have contrast coloured paper.The boat can be used for card making something like Bonn-voyage cards..
If you don't want to cut the square but still want to make the origami sail boat then you can follow the instructions at Howcast
.It has both diagram and video for the instructions also the sail boat looks really cool and can stand like a 3D model.I felt the video is really good and easy to follow.
Today I tried with the origami frog using a dark green origami paper.The frog turned out pretty good.The design/instruction suggests that the frog can be blown but mine had some technical issue :P.It didnt hold air.
The frog instruction has first half similar to crane folding.
A canoe is a small narrow boat, typically human-powered, though it may also be powered by sails or small electric or gas motors. Canoes usually are pointed at both bow and stern and are normally open on top, but can be covered. In its human-powered form, the canoe is propelled by the use of paddles, usually with two people. Paddlers face in the direction of travel, either seated on supports in the hull, or kneeling directly upon the hull. Paddling can be contrasted with rowing, where the rowers usually face away from the direction of travel and use mounted oars (though a wide canoe can be fitted with oarlocks and rowed). Paddles may be single-bladed or double-bladed.(Source-origami-kids)
Origami canoe can be termed slighty higher than simple in the difficulty level,this is because its not tough to fold but tough to unfold the last part to get the shape of the boat.
I started with a standard square orgami paper and got the boat done in the first go.So I believe its not that difficult.Also a suggestion would be to use a double side coloured/contrast coloured paper to get the actual effect.
I have taken 1/2 of 5 7/8th inch square sheet of origami paper
Its a flower today.Till date I have tried many origami flower instruction but I found this one as simple,easy and fast.This flower maynot look so wonderful singly but a bunch of it would really look wonderful.
I would suggest to try a smaller square to make the flower as a very big or very small wouldnt look good.
As I had used 1/4 th of 5 7/8th inch square sheet of origami paper
I suppose this is something we all keep doing ... Origami Fan.Origami fan needs no special skill or practice to fold.On complexity level I would term it as Simple rather very simple.
You can take standard origami paper or a chiyogami paper.Actually I would suggest you try gift papers,chocolate wrappers instead of standard origami paper.
In childhood whenever I used to get a chocolate from a friend on their birthday I would fold this fan out of the wrapper and give it to them :P
Here is my origami fan made out of standard one side coloured origami paper:-
Though I am actually not happy with this fan but still its one of the standard/traditional origami model so I thought it would be good to add it on list.
One more from childhood paper folding..
This needs a square sheet of paper.On complexity level I would term it as simple with very few folds .It can be folded in very less time but interesting .You can use it for playing games,as a flower,the same fold can be used to decorate napkins on the table and so on....
You need a square sheet of paper to start with.Here is my fortune teller.I made it really small so that it can be used as a flower or decorative piece on my Christmas tree( the tree isn't big so the decoration have to be small) .
It is made out of 1/4th of 5 7/8th inch square sheet of origami paper
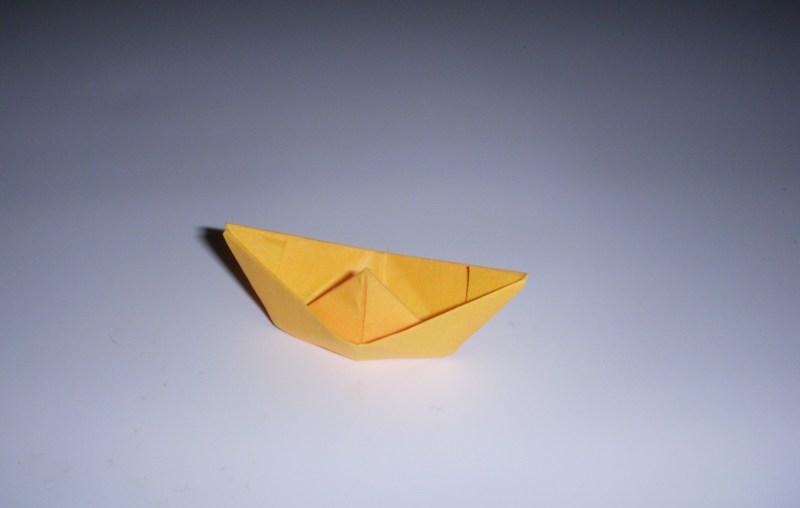
So to start with I folded the very familiar boat.This is a model which I had been folding from my childhood when I didn't even know of origami.
In a rainy season in the class room during the recess we would make this boat and let it sail over the running water until you get caught by the teacher.
It requires a rectangular piece of paper.As I had squared colour papers I took a 5 7/8th inch square sheet of origami paper ,cut it a half and then took 3/4 of that half to start with ( my boat is bit small).
Another one made out of Post-it Notes of Neon colours.You need to cut the paper a bit to get it into rectangular shape.